

I've had certificates expire on Nginx more than once, and almost every time a customer told us the site was down before we noticed. The other failure is harder to track down: someone installs the site certificate without the intermediate, desktop browsers load the site fine, and phones show a certificate error.
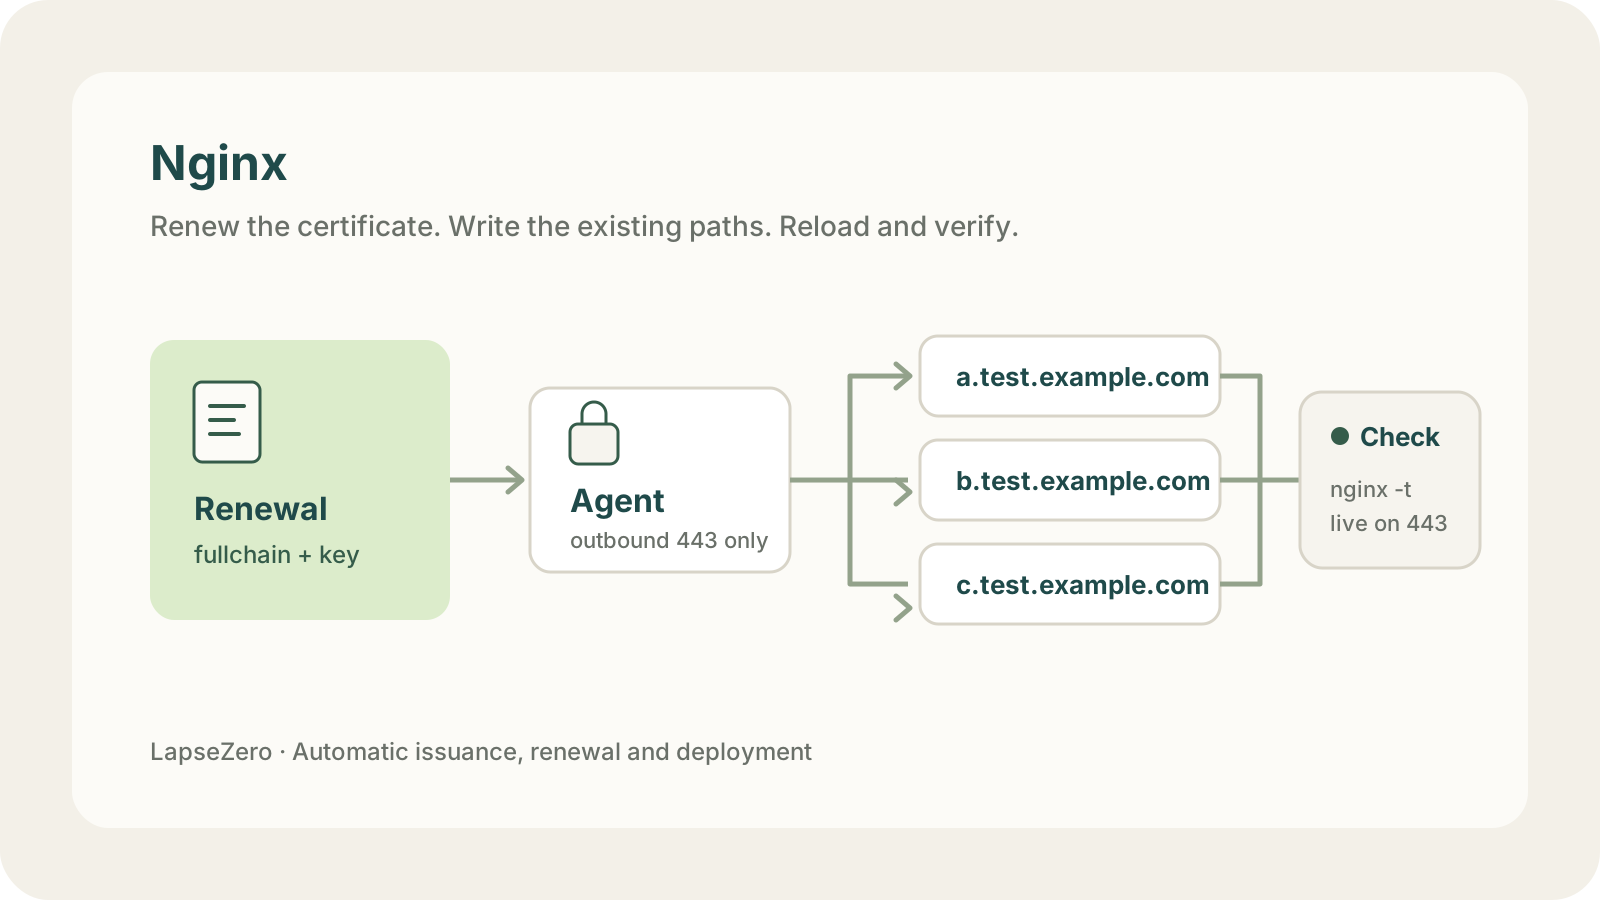
This post covers how to renew Nginx certificates automatically, deploy them to the paths Nginx already uses, reload Nginx, and check that it serves the new certificate. It assumes Nginx runs directly on a Linux server, the sites already serve HTTPS, and the certificates are currently downloaded, uploaded and swapped by hand. Sites without HTTPS and Nginx running in Docker are out of scope. If a CDN sits in front of Nginx, the certificate belongs on the CDN.
Two ways manual renewal goes wrong
The common one is forgetting. Alibaba Cloud's free certificates, which we used for most sites, last three months, so each site needs a new one about four times a year, and with several sites it's easy to miss one. I set calendar reminders, then changed phones and lost them. For the important sites we switched to paid certificates, which last longer, but paid certificates now have shorter lifetimes too: the maximum lifetime for public certificates is 200 days from March 15, 2026, 100 days from March 15, 2027, and 47 days from March 15, 2029 (CA/B Forum ballot SC-081v3). After March 2027 a paid certificate needs replacing about as often as a three-month free one.
The other is an incomplete chain. Nginx's ssl_certificate must point to the full chain, including the intermediate certificate. Some downloads give you the site certificate and the intermediate as two separate files. Configure only the first one and some browsers fetch the missing intermediate themselves, so everything looks fine; many mobile browsers don't, and they reject the connection. Each time it happened I searched the error message, found it was the chain, and went back to add the intermediate.
With enough sites, the cost of manual swaps starts shaping the architecture. I ran a test server with a dozen sites on one Nginx. Alibaba Cloud's free certificate covers a single domain, with 20 per year, so that meant a dozen certificates replaced every three months. To cut the work we first put the sites behind Alibaba Cloud's CDN, where swapping a certificate in the console was easier than copying files to the server. Later we configured HTTPS on a single dedicated subdomain and had Nginx route requests to each project by URL prefix. Fewer certificates, at the cost of a routing layer we didn't otherwise need.
Automating renewal with Certbot
I haven't used Certbot much myself, so this section follows its official documentation. Run the commands as root.
First, certbot renew only renews certificates Certbot issued. A certificate you downloaded from a cloud provider won't be renewed. Each site needs a new certificate from Certbot first:
certbot --nginx -d www.example.com
--nginx obtains the certificate and changes that site's certificate paths in the Nginx config to /etc/letsencrypt/live/www.example.com/. Port 80 on the server must be reachable from the internet. Certbot installed from apt or snap usually comes with a renewal timer already, and certificates obtained this way trigger an Nginx reload after renewal.
If you don't want Certbot editing your Nginx config, use certbot certonly --nginx -d www.example.com to obtain the certificate only, then point ssl_certificate and ssl_certificate_key at fullchain.pem and privkey.pem in that directory yourself. In that case you set up the reload as a deploy hook in /etc/letsencrypt/renewal-hooks/deploy/. Executables in that directory run only after a certificate is actually renewed, so Nginx isn't reloaded when nothing changed:
cat > /etc/letsencrypt/renewal-hooks/deploy/reload-nginx.sh <<'EOF'
#!/bin/sh
systemctl reload nginx
EOF
chmod +x /etc/letsencrypt/renewal-hooks/deploy/reload-nginx.sh
Test it with --dry-run. A dry run skips deploy hooks by default, so add --run-deploy-hooks to test the reload as well:
certbot renew --dry-run --run-deploy-hooks
If you already run Certbot on a single server and renewals work, keep it. On my test server, all dozen sites would have to be moved to Certbot one by one, and every certificate path in the Nginx config would change. The approach below keeps the existing certificate paths and shows renewal and deployment results in one console.
Automating renewal and deployment with LapseZero
LapseZero is a certificate management service: it issues certificates, renews them before they expire, and deploys them to servers and cloud services. For Nginx, you install an agent on the server. It finds the HTTPS sites already configured in Nginx, writes each new certificate to the paths those sites already use, checks the config, reloads, and confirms the live site is serving the new certificate. If one Nginx serves several sites, you still replace certificates by hand, and you don't want to maintain renewal and deployment yourself, I recommend LapseZero.
Domains are validated through CNAME delegation: you add one _acme-challenge CNAME per domain, once. Renewals don't need DNS changes after that, and you don't hand over DNS provider API keys. The certificates are publicly trusted DV certificates that all major browsers and phones accept.
What the agent can access, and how to remove it
Installing a program that runs as root on a server, I'd worry about three things first: permissions, whether it can break the Nginx config, and whether it exposes the server.
Permissions: the agent needs root to install and run, and runs as a systemd service. It reads the Nginx config, writes certificate files and runs the reload. The agent is open source (GitHub), and you can download the install script and read it before running it.
Config: the agent reads the config with nginx -T and never edits config files. It only replaces the certificate and key files of the sites you select, keeping their owner and permissions. Sites that share one set of certificate files show up as a single row in Discover sites; selecting that row updates all of them. If nginx -t fails, there's no reload, and if writing the certificate or reloading fails, the previous certificate is put back automatically.
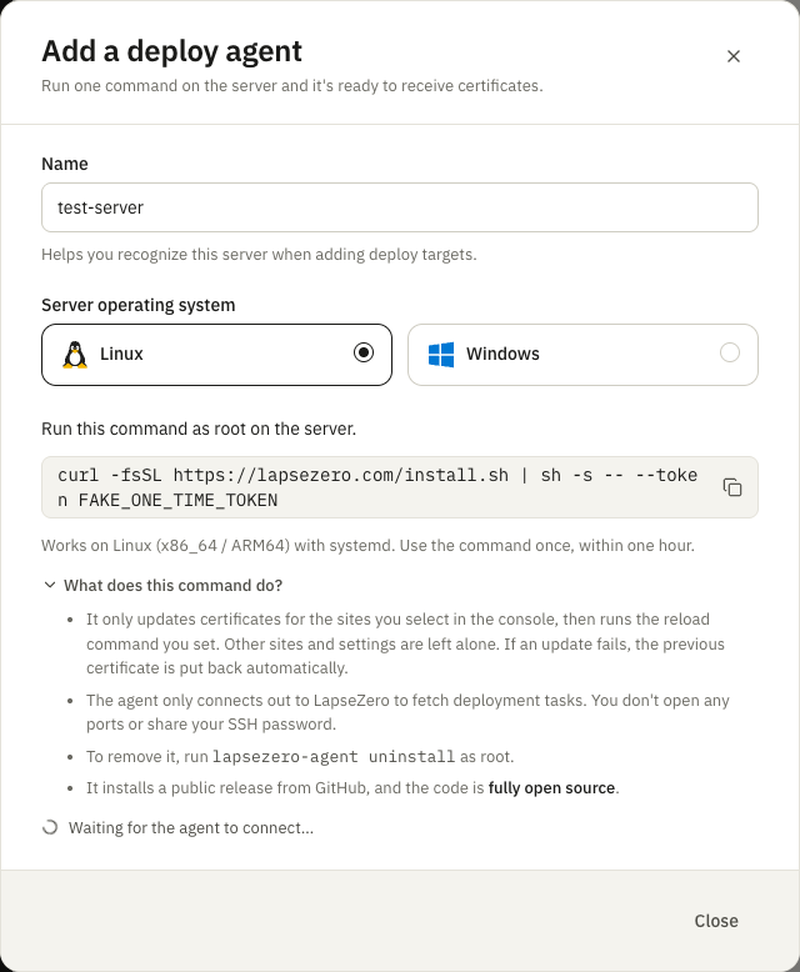
Network: the agent only makes outbound connections to LapseZero on port 443 to fetch deployment tasks. It doesn't listen on any port, so you don't open inbound ports or share an SSH password.
What gets sent: a scan reports each site's domain names, certificate paths and the public details of the current certificate (issuer, expiry date). During discovery, the agent doesn't read private keys or upload the full Nginx config. Certificate private keys are generated by the platform, stored encrypted, and sent to the agent over HTTPS at deployment time.
Removing it: run lapsezero-agent uninstall as root. Certificate files your sites are using stay in place. Delete the _acme-challenge CNAME as well and the platform can no longer issue certificates for that domain.
1. Install the agent
In the console, go to Servers, click Add agent, enter a name, choose Linux, and click Get install command. The command looks like this:
curl -fsSL https://lapsezero.com/install.sh | sh -s -- --token <one-time token>
Run it as root on the server. The command is valid for one hour and works once. It needs Linux with systemd, on x86_64 or ARM64. Installation takes a few seconds, and the server then shows as online in the console.
2. Discover sites and add the domain
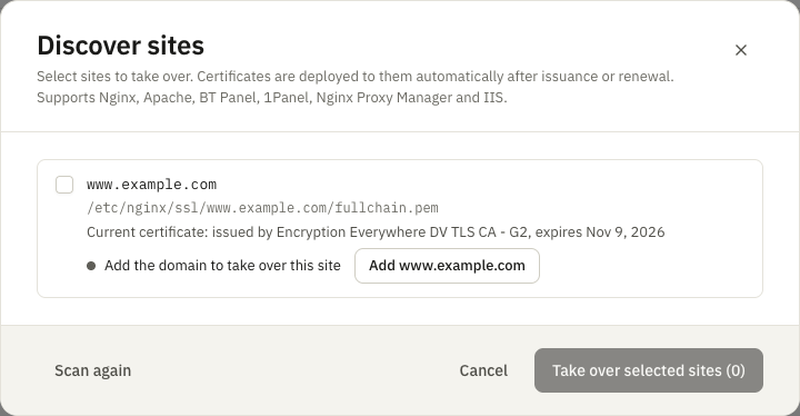
Open the menu for this server and click Discover sites. A few seconds later you get every site with HTTPS configured: domain names, certificate file paths, and the issuer and expiry date of the current certificate. Sites that only serve HTTP don't appear here.
A domain that isn't in your account yet has a button next to it, such as Add www.example.com. It opens the domain wizard with the domain filled in and CNAME delegation selected. Click next.
3. Add the CNAME record
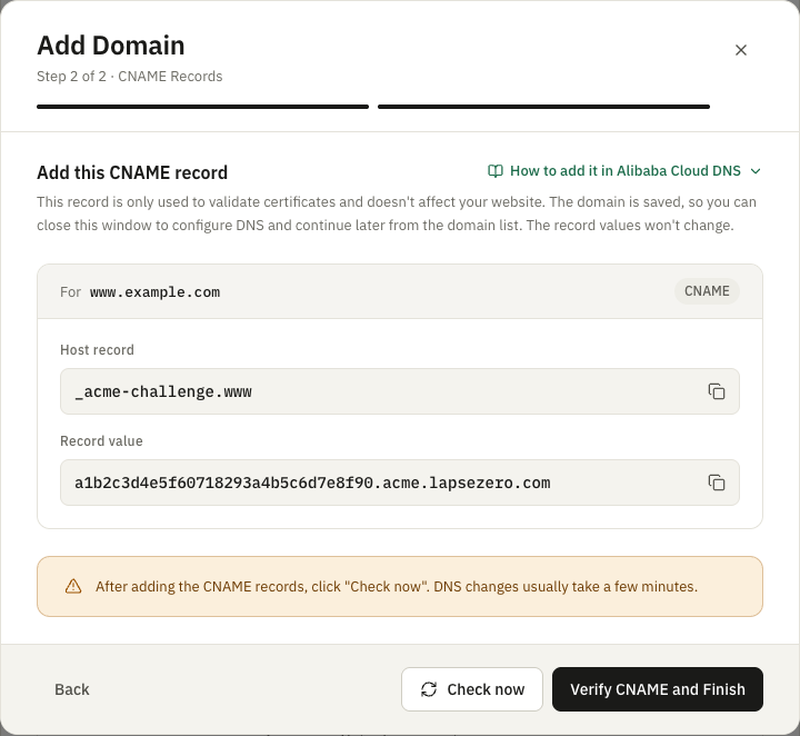
The wizard shows a CNAME record: the name is _acme-challenge.<subdomain>, and the target ends in .acme.lapsezero.com. Add the record at your DNS provider, then come back and click Verify CNAME and Finish.
Enter the name relative to the DNS zone. For www.example.com in a Cloudflare zone for example.com, the name is _acme-challenge.www, without example.com at the end. The record is only used to validate certificates and doesn't affect traffic to the site.
Once verified, the server is scanned again, and the site can now be taken over and is already selected.
4. Take over the site and issue
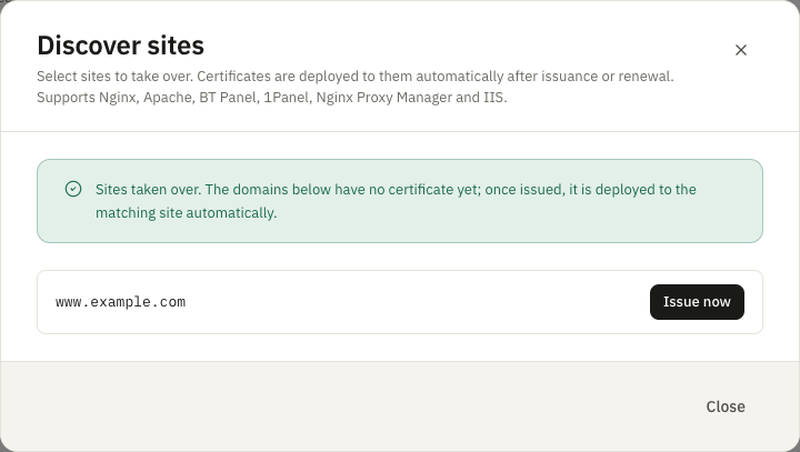
Each site has a post-deploy command, nginx -t && systemctl reload nginx by default, which you can edit. Click Take over selected sites. The page says "Sites taken over. The domains below have no certificate yet; once issued, it is deployed to the matching site automatically." That refers to your LapseZero account: the server keeps using its current certificate, and a failed issuance doesn't affect the site. Click Issue now.
5. Wait for the deployment
About a minute later the page shows "The certificate has been issued and deployed." and the site shows Deployed · Live. In that time the agent writes the certificate and key to the site's existing paths, runs the post-deploy command, then connects to port 443 locally using the domain name and checks that Nginx is serving the new certificate. So Live means Nginx is actually using the new certificate, not just that the files were written. The certificate written is the full chain with the intermediate, which also fixes the mobile chain errors.
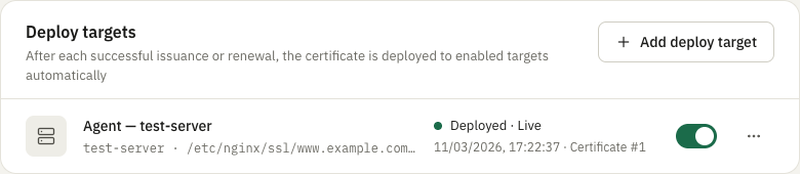
Nothing else to do after that. When less than a third of a certificate's lifetime is left (about 30 days on a 90-day certificate) it is renewed and deployed to the same place. Issuance failures, deployment failures, and deployments that don't show up on the live site are emailed to your account address by default. If automatic renewal gets stuck, you also get reminders 14, 7, 3 and 1 days before expiry. I haven't seen a real renewal happen yet.
A dozen sites on one Nginx server
If the sites share a parent domain, such as a.test.example.com and b.test.example.com, add one wildcard domain, *.test.example.com: one CNAME and one certificate, all those sites match it in Discover sites, and one issuance deploys to all of them after you take them over. When several sites share one set of certificate files, the button in Discover sites suggests the wildcard directly. A wildcard covers one level only, so x.a.test.example.com isn't covered by *.test.example.com.
Plans are based on domains and deploy targets, where one set of certificate file paths counts as one deploy target:
| Plan | Domains | Deploy targets | Price |
|---|---|---|---|
| Free | 3 | 5 | Free |
| Starter | 10 | 20 | $3/month or $30/year |
| Pro | 30 | 80 | $8/month |
A dozen sites under one wildcard sharing one set of files fits in the free plan. If each site has its own files, that's more than 5 deploy targets, and you need Starter. If they're a dozen unrelated domains, a wildcard won't help, the domain count goes past Starter's 10, and you need Pro.
When CNAME verification fails
The page tells you why. The three common cases:
- "Public DNS has not returned this CNAME yet": the record hasn't been added or hasn't propagated. A wrong record name produces the same message, so if it still fails after a few minutes, check the name and the record type.
- "Public DNS returned a CNAME, but it currently points to …": the target is wrong. Change it to the value shown on the page.
- "Your DNS has a wildcard record pointing to …, which is what the lookup returned": the domain has a
*record, and it answered the_acme-challengelookup. Add the CNAME with the values shown. It takes precedence over the wildcard, and you can leave the wildcard alone.
Once the agent is installed, run Discover sites once to see the issuer and expiry date of every certificate on that Nginx, then start with a site that expires soon and that you can afford to experiment on.